TypeScript로 canvas에 원 움직이기
Search for a command to run...
No comments yet. Be the first to comment.
핵심 원칙: "한 번 빌드하고, 어디서든 실행한다 (Build once, run anywhere)" 도커의 가장 큰 장점은 환경 일관성입니다. 동일한 도커 이미지를 사용하여 개발, 테스트, 운영 환경을 구성함으로써 "제 PC에서는 됐는데..." 하는 문제를 최소화할 수 있습니다. 1. 개발 단계 (Development) 목표: 빠른 코드 변경 반영, 쉬운 디버깅, 실제 운영 환경과 유사한 환경 구성. Docker 사용 방안: Dockerf...
목록을 조회할 때 기본적으로 페이지, 정렬, 검색에 대한 처리를 해야 합니다. 이를 쉽게 하는 방법에 대해 소개 합니다. 페이지, 정렬, 검색을 쿼리 인자로 받게 하기 위해 SearchOptions을 만든 후, | SearchOptions.cs public class SearchOptions { public class SearchOptions { [FromQuery(Name = "pn")] [DefaultValue(0)] ...
EF Core는 제한적인 JSON 속성을 지원합니다. EF Core 8에 추가된 기본 형식 컬렉션으로 JSON 열에 매핑할 수 있습니다. public class PrimitiveCollections { public IEnumerable<int> Ints { get; set; } public ICollection<string> Strings { get; set; } public IList<DateOnly> Dates { ge...
DB에서 데이터를 삭제하면 일반적으로 복구할 수 없습니다. 또한 관계에 따라 영구 삭제 자체가 어려울 수도 있습니다. 그래서 데이터를 영구 삭제하는 대신 IsDeleted 속성을 true로 주고 IsDeleted 속성을 필터링해서 조회하는 방법을 사용하기도 합니다. 이를 소프트 삭제라고 합니다. 그런데 EF에서 알아서 데이터 삭제 시 소프트 삭제를 하고 쿼리시 IsDeleted 속성을 체크해서 삭제한 데이터를 제외한 데이터만 쿼리하게 하는 ...
EF Core를 사용하면서 문자열 길이 등의 특성을 일일이 지정하는 것은 번거롭습니다. ... [MaxLength(32)] public string? 제목 { get; set; } 엔터티가 한 개일 때는 상관이 없으나 제목 유형이 여러 엔터티에 사용될 경우 유형을 지정하기 번거롭습니다. 속성 유형을 도메인으로 관리하면 참 편할텐데요, ValueConverter를 이용할 수 있습니다. 그런데 이것을 인터페이스 정적 추상를 사용해서 다음처럼 ...
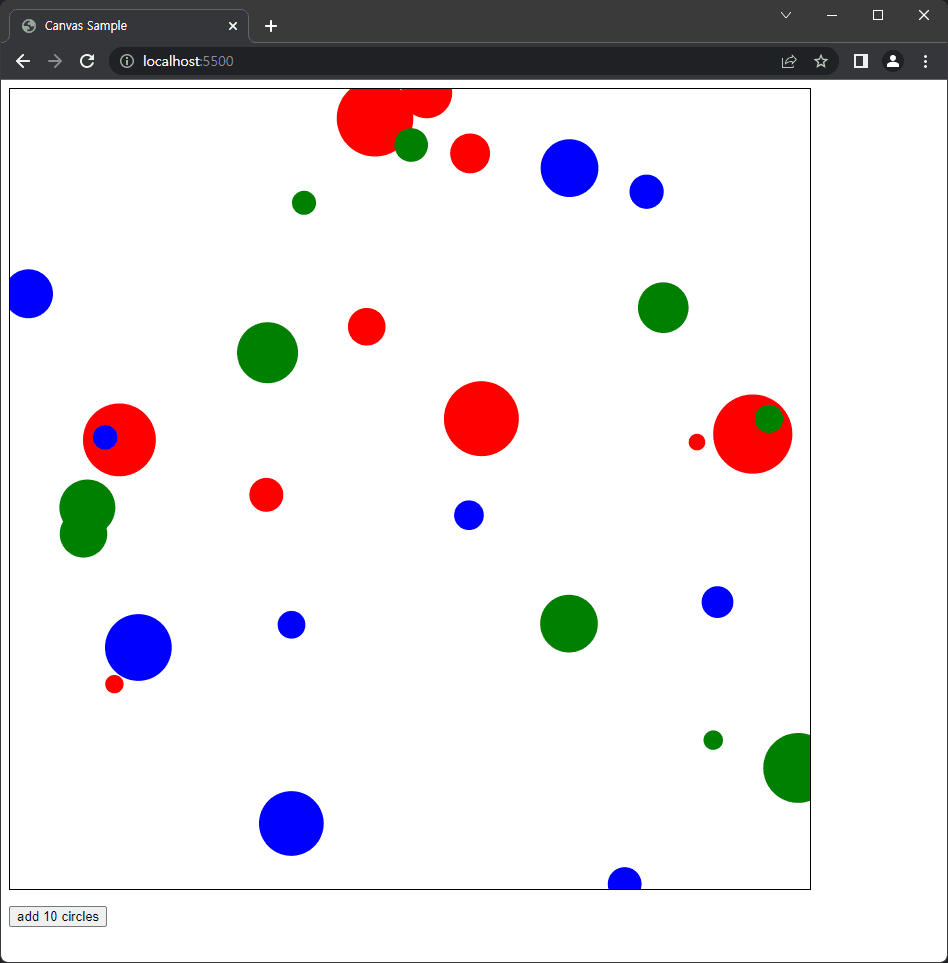
TypeScript를 이용해 canvas에 원을 움직이는 예제를 만들어 보겠습니다.
본격적으로 개발하기 위해 Visual Studio Code에 TypeScript 개발 환경을 만들 것입니다.
tsc를 가장 쉽게 설치하는 방법은 npm을 이용하는 것입니다.
$ npm install -g typescript
정상적으로 설치되었는지 버젼을 통해 확인 합니다.
$ tsc --version
Hello World 예제 부터 시작해 봅시다. HelloWorld 디렉토리를 만든 후 VS Code를 실행합니다.
$ mkdir HelloWorld
$ cd HelloWorld
$ code .
helloworld.ts를 만든 후 아래의 코드를 추가합니다.
let message: string = "Hello World";
console.log(message);
통합 터미널 (Ctrl + `)을 열고 tsc helloworld.ts로 컴파일을 하면 helloworld.js를 얻을 수 있습니다. Node.js를 통해 실행해 볼 수 있습니다.
$ node .\helloworld.js
Hello World
TypeScript를 이용해 canvas에 원을 움직이는 코드를 작성하기 위해서는 다음의 세 개의 파일이 필요합니다.
tsconfig.json : TypeScript 컴파일러를 구성index.html : canvas와 원을 추가하는 button이 있는 단순한 HTML 페이지main.ts : 우리가 작성하고 컴파일 할 TypeScript 파일파일은 다음과 같이 구성합니다.
{
    "compilerOptions": {
        "target": "es5",
        "sourceMap": true,
        "lib": [
            "es5",
            "dom"
        ],
        "noUnusedLocals": true,
        "module": "commonjs"
    }
}
위 설정에 대한 자세한 사항은 TypeScript 문서의 What is a tsconfig.json를 통해 확인할 수 있습니다.
파일은 다음과 같이 구성합니다. 우리가 TypeScript로 canvas에 원을 움직이게 하기 위한 간단한 HTML 구성을 할 것입니다.
<html>

<head>
    <title>Canvas Sample</title>
</head>

<body>
    <canvas id="canvas" width="800" height="800"
            style="border: 1px solid black;">
    </canvas>
    <p></p>
    <button>add 10 circles</button>
    <script src="main.js"></script>
</body>

</html>
마지막으로 구현해야 할 TypeScript 파일입니다. 우리는 클래스를 이용할 것이므로 다음의 간단한 구성으로 시작합니다.
class DrawingApp {

}

new DrawingApp();
웹페이지로 띄울 것이기 때문에 Live Server를 이용해서 이를 설정합니다.
Live Server를 VS Code 확장에서 설치 합니다.

설치되면 오른쪽 하단에 Go Live 버튼이 생성됩니다. 이 버튼을 누르면 현 디렉토리로 웹 서버를 띄우게 됩니다.

터미널에서 tsc를 실행합니다.
$ tsc
tsc를 실행하면 tsconfig.json 구성에 의해 main.js 및 main.js.map 파일이 생성됩니다.
만약 TypeScript 소스코드를 변경할 때마다 자동으로 빌드되게 하려면 tsconfig.json의 compilerOptions에 "watch": true를 추가합니다.
크롬 브라우저에서 디버깅을 하려면 다음의 launch.json을 .vscode 디렉토리에 추가 합니다.
{
    "version": "0.2.0",
    "configurations": [
        {
            "type": "pwa-chrome",
            "request": "launch",
            "name": "Launch Chrome against localhost",
            "url": "http://localhost:5500",
            "webRoot": "${workspaceFolder}"
        }
    ]
}
이때 url은 Live Server의 실행 포트를 입력하도록 합니다.
이제 적절한 위치에 중단점 (F9)을 지정하고 디버깅 시작 (F5)를 통해 디버깅을 시작할 수 있습니다.


디버깅 환경이 구성되었으므로 코드를 조금 바꿔 봅시다.
| main.ts
class DrawingApp {
    private canvas: HTMLCanvasElement;
    private context: CanvasRenderingContext2D;

    constructor(canvas: HTMLCanvasElement) {
        this.canvas = canvas;
        this.context = canvas.getContext("2d");

        this.context.fillStyle = "blue";
        this.context.beginPath();
        this.context.arc(100, 100, 16, 0, 2 * Math.PI);
        this.context.fill();
    }
}
canvas의 context를 획득해서 청색 원을 canvas에 그려보았습니다. constructor에 canvas 객체를 넘겨줘야 하므로 index.html도 다음처럼 변경 합니다.
| index.html
<html>

<head>
    <title>Canvas Sample</title>
</head>

<body>
    <canvas id="canvas" width="800" height="800"
            style="border: 1px solid black;">
    </canvas>
    <p></p>
    <button>add 10 circles</button>
    <script src="main.js"></script>
    <script type="text/javascript">
        const app = new DrawingApp(document.getElementById('canvas'));
    </script>
</body>

</html>
실행하면 다음과 같이 canvas에 청색 원이 그려지는 것을 확인할 수 있습니다.

Live Server는 파일을 감시해서 변경되면 웹페이지를 갱신하는 기능이 있어서 index.html을 변경하면 웹페이지에 바로 반영을 해줍니다.
또한 tsconfig.json의 compilerOptions의 "watch": true 설정에 의해 main.ts가 변경될 때 tsc가 main.js로 컴파일 해주고 Live Server가 이를 감지해 웹페이지에 반영해 줍니다.
| main.js의 this.context.fillStyle = "blue";를 this.context.fillStyle = "red";로 변경한 후 파일 저장시

canvas 다시 그리기원을 이동하게 하려면 주기적으로 canvas를 다시 그려야 하는데 웹브라우저에서 다시 그릴 수 있는 시점을 알아야 합니다. 이 때 requestAnimationFrame()를 이용할 수 있습니다.
class DrawingApp {
    private canvas: HTMLCanvasElement;
    private context: CanvasRenderingContext2D;

    constructor(canvas: HTMLCanvasElement) {
        // ...

        requestAnimationFrame(this.redraw);
    }

    private redraw() {
        console.log("!!!");

        requestAnimationFrame(this.redraw);
    }
}
그런데 이 코드는 한번 redraw()가 호출된 후 다시 requestAnimationFrame(this.redraw);가 실행될 때 정상 동작하지 않습니다. 왜냐하면 콜백으로 호출된 메서드에서 this는 DrawingApp 객체가 아닌 requestAnimationFrame() 메서드가 있는 Window 객체가 되기 때문입니다.
이를 개선하기 위해 redraw()를 다음처럼 변경해봅시다.
    private redraw = () => {
        console.log("!!!");

        requestAnimationFrame(this.redraw);
    }
이제 잘 redraw()가 계속해서 호출이 됩니다. this의 작동 방식 및 특징 및 수정 방법은 this in TypeScript를 참고하세요.
원을 표시하려면 원의 좌표 정보 및 반지름, 색 등의 정보를 따로 정의하는 것이 좋습니다.
type Circle = {
    x: number,
    y: number,
    readonly radius: number,
    readonly color: string,
    xInc: number,
    yInc: number,
};
이제 원 목록을 담는 클래스 필드 및 색 관련 필드를 추가합니다.
    private readonly circles: Circle[] = [];
    private readonly colors: readonly string[] = ["red", "green", "blue"];
    private colorsCount: number = 0;
원을 추가할 때마다 다른 색을 적용하기 위해 getColor() 메서드를 만들고
    private getColor(): string {
        let result = this.colors[this.colorsCount];
        this.colorsCount = (this.colorsCount + 1) % this.colors.length;
        return result;
    }
원을 추가하는 메서드를 만들고,
    public addCircles = (numbers: number) => {
        var color = this.getColor();
        for (var i = 0; i < numbers; i++) {
            this.circles.push({
                x: this.canvas.width * Math.random(),
                y: this.canvas.height * Math.random(),
                radius: 32 * Math.random() + 8,
                xInc: 5 * Math.random() + 1,
                yInc: 5 * Math.random() + 1,
                color: color
            });
        }
    }
다음은 원을 그리고 이동하는 메서드를 만듭니다.
    private drawCircle(circle: Circle) {
        this.context.fillStyle = circle.color;
        this.context.beginPath();
        this.context.arc(circle.x, circle.y, circle.radius, 0, 2 * Math.PI);
        this.context.fill();
    }

    private moveCircle(circle: Circle) {
        circle.x += circle.xInc;
        circle.y += circle.yInc;

        if (circle.x < 0 || circle.x > this.canvas.width) {
            circle.xInc *= -1;
        }
        if (circle.y < 0 || circle.y > this.canvas.height) {
            circle.yInc *= -1;
        }
    }
| main.ts
class DrawingApp {
    private canvas: HTMLCanvasElement;
    private context: CanvasRenderingContext2D;

    private readonly circles: Circle[] = [];
    private readonly colors: readonly string[] = ["red", "green", "blue"];
    private colorsCount: number = 0;


    constructor(canvas: HTMLCanvasElement) {
        this.canvas = canvas;
        this.context = canvas.getContext("2d");

        this.addCircles(10);

        requestAnimationFrame(this.redraw);
    }

    private redraw = () => {
        this.context.fillStyle = "white";
        this.context.fillRect(0, 0, this.canvas.width, this.canvas.height);

        for (const circle of this.circles) {
            this.drawCircle(circle);
            this.moveCircle(circle);
        }

        requestAnimationFrame(this.redraw);
    }

    private drawCircle(circle: Circle) {
        this.context.fillStyle = circle.color;
        this.context.beginPath();
        this.context.arc(circle.x, circle.y, circle.radius, 0, 2 * Math.PI);
        this.context.fill();
    }

    private getColor(): string {
        let result = this.colors[this.colorsCount];
        this.colorsCount = (this.colorsCount + 1) % this.colors.length;
        return result;
    }

    private moveCircle(circle: Circle) {
        circle.x += circle.xInc;
        circle.y += circle.yInc;

        if (circle.x < 0 || circle.x > this.canvas.width) {
            circle.xInc *= -1;
        }
        if (circle.y < 0 || circle.y > this.canvas.height) {
            circle.yInc *= -1;
        }
    }

    public addCircles = (numbers: number) => {
        var color = this.getColor();
        for (var i = 0; i < numbers; i++) {
            this.circles.push({
                x: this.canvas.width * Math.random(),
                y: this.canvas.height * Math.random(),
                radius: 32 * Math.random() + 8,
                xInc: 5 * Math.random() + 1,
                yInc: 5 * Math.random() + 1,
                color: color
            });
        }
    }
}

type Circle = {
    x: number,
    y: number,
    readonly radius: number,
    readonly color: string,
    xInc: number,
    yInc: number,
};
다음으로 버튼을 눌렀을 때 원을 추가할 수 있도록 index.html을 다음과 같이 수정합니다.
| index.html
<html>

<head>
    <title>Canvas Sample</title>
</head>

<body>
    <canvas id="canvas" width="800" height="800"
            style="border: 1px solid black;">
    </canvas>
    <p></p>
    <button id="add">add 10 circles</button>
    <script src="main.js"></script>
    <script type="text/javascript">
        const app = new DrawingApp(document.getElementById('canvas'));

        const button = document.getElementById('add');
        button.onclick = () => app.addCircles(10);
    </script>
</body>

</html>

tsc에 의해 변환된 JavaScript 코드컴파일된 JavaScript 코드를 살펴보는 것은 흥미롭니다. 다음은 컴파일된 JavaScript 코드입니다.
var DrawingApp = /** @class */ (function () {
    function DrawingApp(canvas) {
        var _this = this;
        this.circles = [];
        this.colors = ["red", "green", "blue"];
        this.colorsCount = 0;
        this.redraw = function () {
            _this.context.fillStyle = "white";
            _this.context.fillRect(0, 0, _this.canvas.width, _this.canvas.height);
            for (var _i = 0, _a = _this.circles; _i < _a.length; _i++) {
                var circle = _a[_i];
                _this.drawCircle(circle);
                _this.moveCircle(circle);
            }
            requestAnimationFrame(_this.redraw);
        };
        this.addCircles = function (numbers) {
            var color = _this.getColor();
            for (var i = 0; i < numbers; i++) {
                _this.circles.push({
                    x: _this.canvas.width * Math.random(),
                    y: _this.canvas.height * Math.random(),
                    radius: 32 * Math.random() + 8,
                    xInc: 5 * Math.random() + 1,
                    yInc: 5 * Math.random() + 1,
                    color: color
                });
            }
        };
        this.canvas = canvas;
        this.context = canvas.getContext("2d");
        this.addCircles(10);
        requestAnimationFrame(this.redraw);
    }
    DrawingApp.prototype.drawCircle = function (circle) {
        this.context.fillStyle = circle.color;
        this.context.beginPath();
        this.context.arc(circle.x, circle.y, circle.radius, 0, 2 * Math.PI);
        this.context.fill();
    };
    DrawingApp.prototype.getColor = function () {
        var result = this.colors[this.colorsCount];
        this.colorsCount = (this.colorsCount + 1) % this.colors.length;
        return result;
    };
    DrawingApp.prototype.moveCircle = function (circle) {
        circle.x += circle.xInc;
        circle.y += circle.yInc;
        if (circle.x < 0 || circle.x > this.canvas.width) {
            circle.xInc *= -1;
        }
        if (circle.y < 0 || circle.y > this.canvas.height) {
            circle.yInc *= -1;
        }
    };
    return DrawingApp;
}());
//# sourceMappingURL=main.js.map
VS Code에 TypeScript 개발환경을 구성해서 코딩 결과를 웹브라우저를 통해 확인할 수 있도록 예제를 통해 확인해 보면서 TypeScript의 강력한 타입 검사 기능과 VS Code를 이용한 편리한 디버깅 환경을 살펴볼 수 있었습니다.
https://www.maum.in/samples/moving_circles/index.html